
How To Make Cake Pops {learn from our trials and errors}

My younger sister’s Dr. Seuss-inspired baby shower was this past weekend and it was mostly DIY because we were on a budget The first tutorial I am going to be showing you is the most fun of them all – How to Make Cake Pops!
We started weeks before the shower trying out different methods and flavors and sprinkles and more. It took us three “sessions” before we were happy with the results so I’m bringing you all of our trials and errors so I can hopefully simplify your attempts.
Step 1: Bake a basic box cake mix.
My sister and I read several cake pops posts and articles before we started our first attempt, but each one was so different. One of the common agreements; however, was that a basic box cake mix was great for making cake pops. This is a good thing because my sister and I were not about to start from scratch.
Tip: We found that the cake was more moist and easier to work with (using less icing later in the tutorial – making the pop less “rich”) when we used only egg whites in the cake mix.
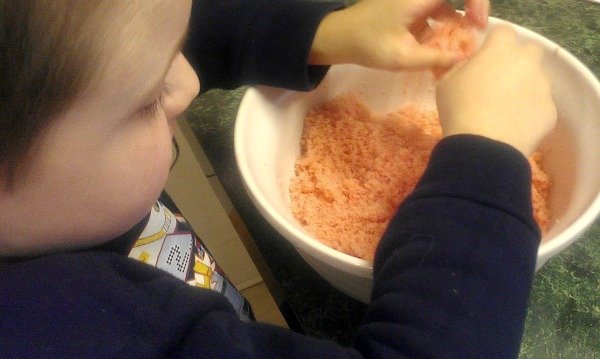
Step 2: Crumble the cake.
This part was fun for my boy. I started the crumbling while he washed his hands super good, then dove right in to crumble it up. There is no special technique here, just crumble. It is helpful to have a fully cooled cake when crumbling. After our first attempt, we chose to bake the cake the night before so it would cool over night. Depending on the time you have, you might choose to put it in the refrigerator for a while to fully cool.
Tip: If you have dark areas or partially “crispy” areas on the cake after baking, slice thin layers off of the cake with a serrated knife. This will also help later when you are forming the balls of cake.
Step 3: Add icing to the crumbled cake.
We started with two large mixing spoons of icing mixed with the crumbled cake. Some tutorials tell you to use half of a can of store-bought icing and that is pretty accurate to what we used.
You don’t want the mixture to be overly moist. In fact, after you add the icing, you will be tempted to add more. Don’t do it! After folding the two scoops of icing into the cake, you will need to use your hands to make it mix better. You want the mixture to be like that of a dry playdoh, but not crumbly. With the icing, less is better (to avoid the pops being too sweet) and you only need enough to make the cake form into balls.
Tip: On our first attempt, we used whipped frosting and the cake pops didn’t form as well. I would not recommend whipped or creamy. Plain store-bought frosting works perfect!
Update: I recently made cheesecake pops and used a homemade cheesecake instead of icing. It takes away the sweetness some and holds together really well. Check out the recipe here:

M&M’s Pumpkin Cheesecake Pops and Apple Cider Wassail » Fall Recipes

These are the cake balls from our first attempt. Notice they were moist and some are not as round as others because the mixture was difficult to form. I cannot tell you if that was due to whipped icing or too much icing. You will see some cake pops further down that are not as moist.
Step 4: Freeze (slightly) the cake balls
After you have formed all of the cake mixture into balls, you will want to freeze or refrigerate them to make them more firm. You do not want to freeze them solid as you are about to insert the sticks in them, but you do need them to be firm.


Step 5: Insert the cake pop sticks into the cake balls.
Melt a small amount of the almond bark or candy coating and dip the candy stick in before inserting into the cake balls. This will help anchor the stick in the cake pop for dipping later.

After you get the sticks into all of the cake balls, put them back in the freezer or refrigerator for about 5 minutes for the chocolate to harden.

Step 6: Decorate the cake pops
Pull out a few cake pops at a time to decorate. What worked best for us was decorating five pops at a time. When we tried to pull out more, the cake began to soften and fall apart.
To decorate the cake pops, we used almond bark or candy coating, melted to a runny texture. Once the bark was melted in it’s tray, we poured it into a glass measuring cup for dipping. This way when the bark began to get thick, we could reheat with no transfer from the container. You may need to reheat the bark every 10-15 cake pops as it cools. The measuring cup also was tall and narrow for better dipping.
Tip: When dipping, lower the cake pop straight into the melted bark and cover the bubble of bark that formed when you inserted the stick. If your bark is getting low and it does not cover that bubble, move the stick from side to side, not in a stirring motion. The stirring motion will loosen the cake from the stick and may fall off into your melted bark.
Tip learned from Bakerella: When you pull the cake pop straight out of the melted bark, roll the pop around over the glass for the excess to drip off. Using the hand that is not holding the pop, tap on the hand that is holding the pop to encourage the bark to drip. Do not tap the stick on the side of the cup or bowl you are using as this may cause your cake to fall off the stick.

Once you have the excess bark off the cake pop, you can use sprinkles or some other type of decoration to make your pops pretty. We used sugar crystals of different colors as well as a few other sprinkles that my sister had around her house.
This part of the pop making took both of us. I would dip the cake pop and drip off the excess and then my sister would start the sprinkles. She just shook the sprinkles as I rotated the pop under them. I don’t believe that is any particular technique that I can recommend as we tried several. Sometimes the bark was runny and I would have to let it drip again and sometimes she was able to “catch” the drip with sprinkles. Sometimes the sprinkles “melted” into the bark more than other times. This is a trial and error that you will have to work on yourself.


{note: you can see in this picture a failed attempt at a pop (left) that we tried to “stir” in the melted bark, the pop was getting warm, the bark was getting cold. You may also notice my sister’s girlfriend’s attempt (right) at using the whipped frosting to cover a cake pop.}
Let the cake pops rest in a way that you will display them. We tried displaying a few of the pops upright and a few down. My sister decided that she liked the idea of them down so we didn’t try to perfect the upright pops in our future attempts. We let our cake pops cool in the refrigerator before doing anything else with them.


Step 7: Display
For the baby shower, we picked up some small cellophane bags and twist ties for the pops. We made labels for each of them (tutorial coming soon!) and gave them out as party favors. Everyone loved the idea of them and we had plenty for each party-goer to take home several.

Step 8: Enjoy!
Each time we made the cake pops, the taste was better and better. There is a balance that you want to reach where the cake is not too moist, the icing is not too prominent, and the coating is not too thick.
Making cake pops is not a particularly difficult task, but it can be time-consuming if you want to make them look a certain way or if you want to minimize the “oopsies”. It is a fun project and since cake pops are so popular right now, you can make your guests “ooh” and “ahh” for very little money!
Supplies Needed:
{links to the supplies we used are affiliate links}
- Box cake mix (we used Betty Crocker’s Devil’s Food Cake)
- Eggs (we used only the egg whites)
- Oil
- Frosting (we used Betty Crocker’s Chocolate Frosting)
- Almond Bark (we used Plymouth Pantry Almond Bark Vanilla)
- Decorations (we used Sugar Crystals)
Supplies you might want:
- Parchment paper or foil to line a cookie sheet
- Clear party bags (if you are using them to give away)


Those turned out so great! Great tips!
Hi I’m making my cake pops at this moment but I used ganache not icing cause I don’t like butter creams, and I m putting on them some chocolate and some left fondant that I have ^_^
What happens if I make the cake the night before and then crumble the next day ? Or if I make cakepops night before ? Will anything happen the next day ?
That will work perfectly. They will have time to cool. Put them in the fridge, not the freezer.
Nice! You make it seem really easy.
It really IS easy, Melissa!
Wow I want cake now!
I think I know a special mom who could make some cake pops with you this weekend. Tell her I said it’s easy!
Oh trust me, I told her ^_^ I have been wanting sweet treats for a while now!
AHHH! I want one!
I notice that you used several different cakes throughout your attempts. Did you notice if any particular type of cake held up better than others? I’ve heard that chocolate works best for cake pops, but plan on doing this for a baby shower and the mom wants anything but chocolate.
We only used strawberry the first time and chocolate the 2nd and 3rd times. I can’t really tell you because with the strawberry we used whipped icing and that did NOT work. I think we totally need to try other flavors and post about our experiments.
The chocolate ones look beautiful! I tried making cake pops once (I have a machine for them). The stick piece was an epic fail. The cake part themselves turned out well, but I couldn’t get the stick to stay.
Do you have the tutorial for the tags?
Not yet, but very soon!!!
This is my next project, to try making cake pops this way by crumbling the cake. We have the Babycakes Cake Pop Maker, but I’ve heard that crumbling the cake and mixing with frosting makes them taste so much better. You make it look easy!:) Thank you for linking up to Inspire Me Wednesday!
Mel, it is a little messy, and they are rich and moist, but it’s fun!
Thanks for the tips! I didn’t know all of that.
This is the best tutorial that I’ve seen so far. I pinned it. I’m going to try it with my kids.
Thanks for making it look so easy.
These look tasty! Great tutorial. Althought its too much sugar for me, I will enjoy the yummy pictures